
Lesson: Coppernickel Goes Mondrian
Posted February 6, 2020by
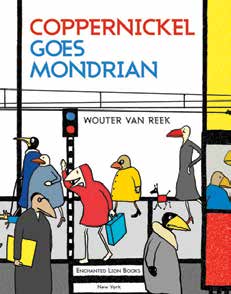
Lesson to be used along with Coppernickel Goes Mondrian, by Wouter van Reek, used with permission from Enchanted Lion Books.
Materials
- Visuals of rhythm cards 1 and 2 and visuals 1 and 2 (colored square images).
- Visuals of Mondrian’s art works, Broadway Boogie-Woogie, Victory Boogie-Woogie and Composition A.
- White and black construction paper
- Red, yellow, and blue construction paper, scissors, and glue
- Red, yellow, and blue markers, crayons, or colored pencils.
The Art
- After reading book with students, show rhythm card 1 visual.
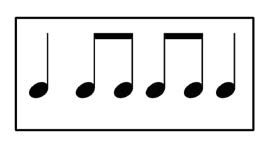
- Ask students to identify quarter notes and eighth notes. Ask students how the notes are arranged; help them discover that the pattern is the same forwards and backwards.
- Define symmetry.
- Show next rhythm card 2. Ask if this rhythm is also symmetrical (no).
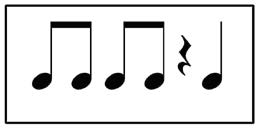
- Define asymmetry and show other images and examples.
- Show visuals of Piet Mondrian’s work, Broadway Boogie-Woogie, Victory Boogie-Woogie and Composition A. Allow students time to discuss.
- Mondrian was inspired by rhythm and music, especially jazz. Show Visual 1.
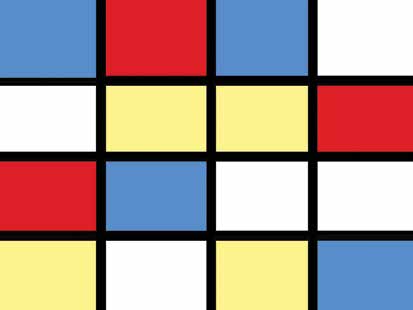
- Ask students to determine if image is symmetrical or asymmetrical. How many rectangles are in the top row?
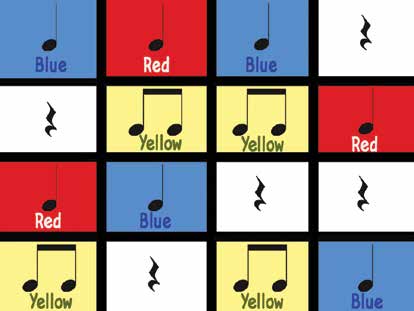
- Add colors and notation and show Visual 2.
The Music
- Have students speak the colors of the top row aloud (blue, red, blue, white) while teacher plays steady beat on drum.
- Repeat, asking students to think the word “white.”
- Speak the second row of colored squares. Think the word “white.”
- In three groups, have the students play as follows.
- Group One – Play metal percussion instruments on yellow.
- Group Two – Play drums on blue.
- Group Three – Play wooden percussion instruments on red.
- Practice playing the first example again (without words or rhythm).
- Play top row of rectangles, second row, etc., then play two rows, and finally play all four rows.
- Groups trade instruments (metals go to skins, drums to woods, woods to metal); perform again, etc.
The Art Reprise
- While listening to jazz selections, groups will create a similar piece of artwork using red, yellow, blue, and white squares with black lines.
- Using white construction paper as background, cut black construction paper to use as lines.
- Use construction paper, markers, crayons, or colored pencils to create color blocks.
- Have each group decide on instrument timbres for different colors.
- Practice and perform.
Extension
- Have each group add movements for each color as they play instruments.
- Have students create a form including an introduction and coda.
- Practice and perform.
This lesson has been reproduced with permission and is an excerpt from Aimee’s book Painted Music. Copyright 2018 by Beatin’ Path Publications.
Download a pdf of Aimee’s lesson here.
See all posts by Aimee Curtis Pfitzner
4 Comments
Leave a Comment
Filed under Lesson Plans
Sign up for latest Orff Tips, Lesson Plans and Advocacy Tools

Empower your students to create their own music in this free 3-day challenge with Roger Sams. (Lessons delivered via email)

Learn about the legendary factory that started it all and why so many teachers like you love our instruments.

At what age group is this lesson aimed?
Thanks Aimee! This is a brilliant lesson. I will definitely use this material.
Thanks, Sue! The book it is from, Painted Music, has many other lessons with children’s literature, art, and music interwoven together. It is available in print and also as an e-book directly from Beatin’ Path Publications – http://www.singsmileplay.com
Hi Christina,
So sorry for the late response – I did not receive a notification about your comment. I would say late first or second grade. Students would need to be comfortable with notation and have experience with group composition. Hope that helps! 🙂