Skin and Bones Part 2
There was an Old Lady All Skin And Bones: Part 2
Did you miss Skin and Bones Part 1? Click here!
In part two of his post using the folk song “Skin and Bones”, Drue Bullington shares how to use this favorite folk song with upper elementary students to continue the fun through 6th grade!
4th Grade
Level I
In 4th Grade we return to the beginning of “Skin and Bones” in a way. The first experiences with the song from the young musicians’ standpoint was to sing the “Song of the Wind.” In 4th grade, we change the way students experience the melody by asking them to play it on a glockenspiel.
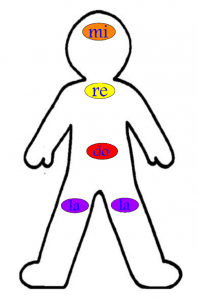
Ask students to sing the song of the wind first from the Body Scale:
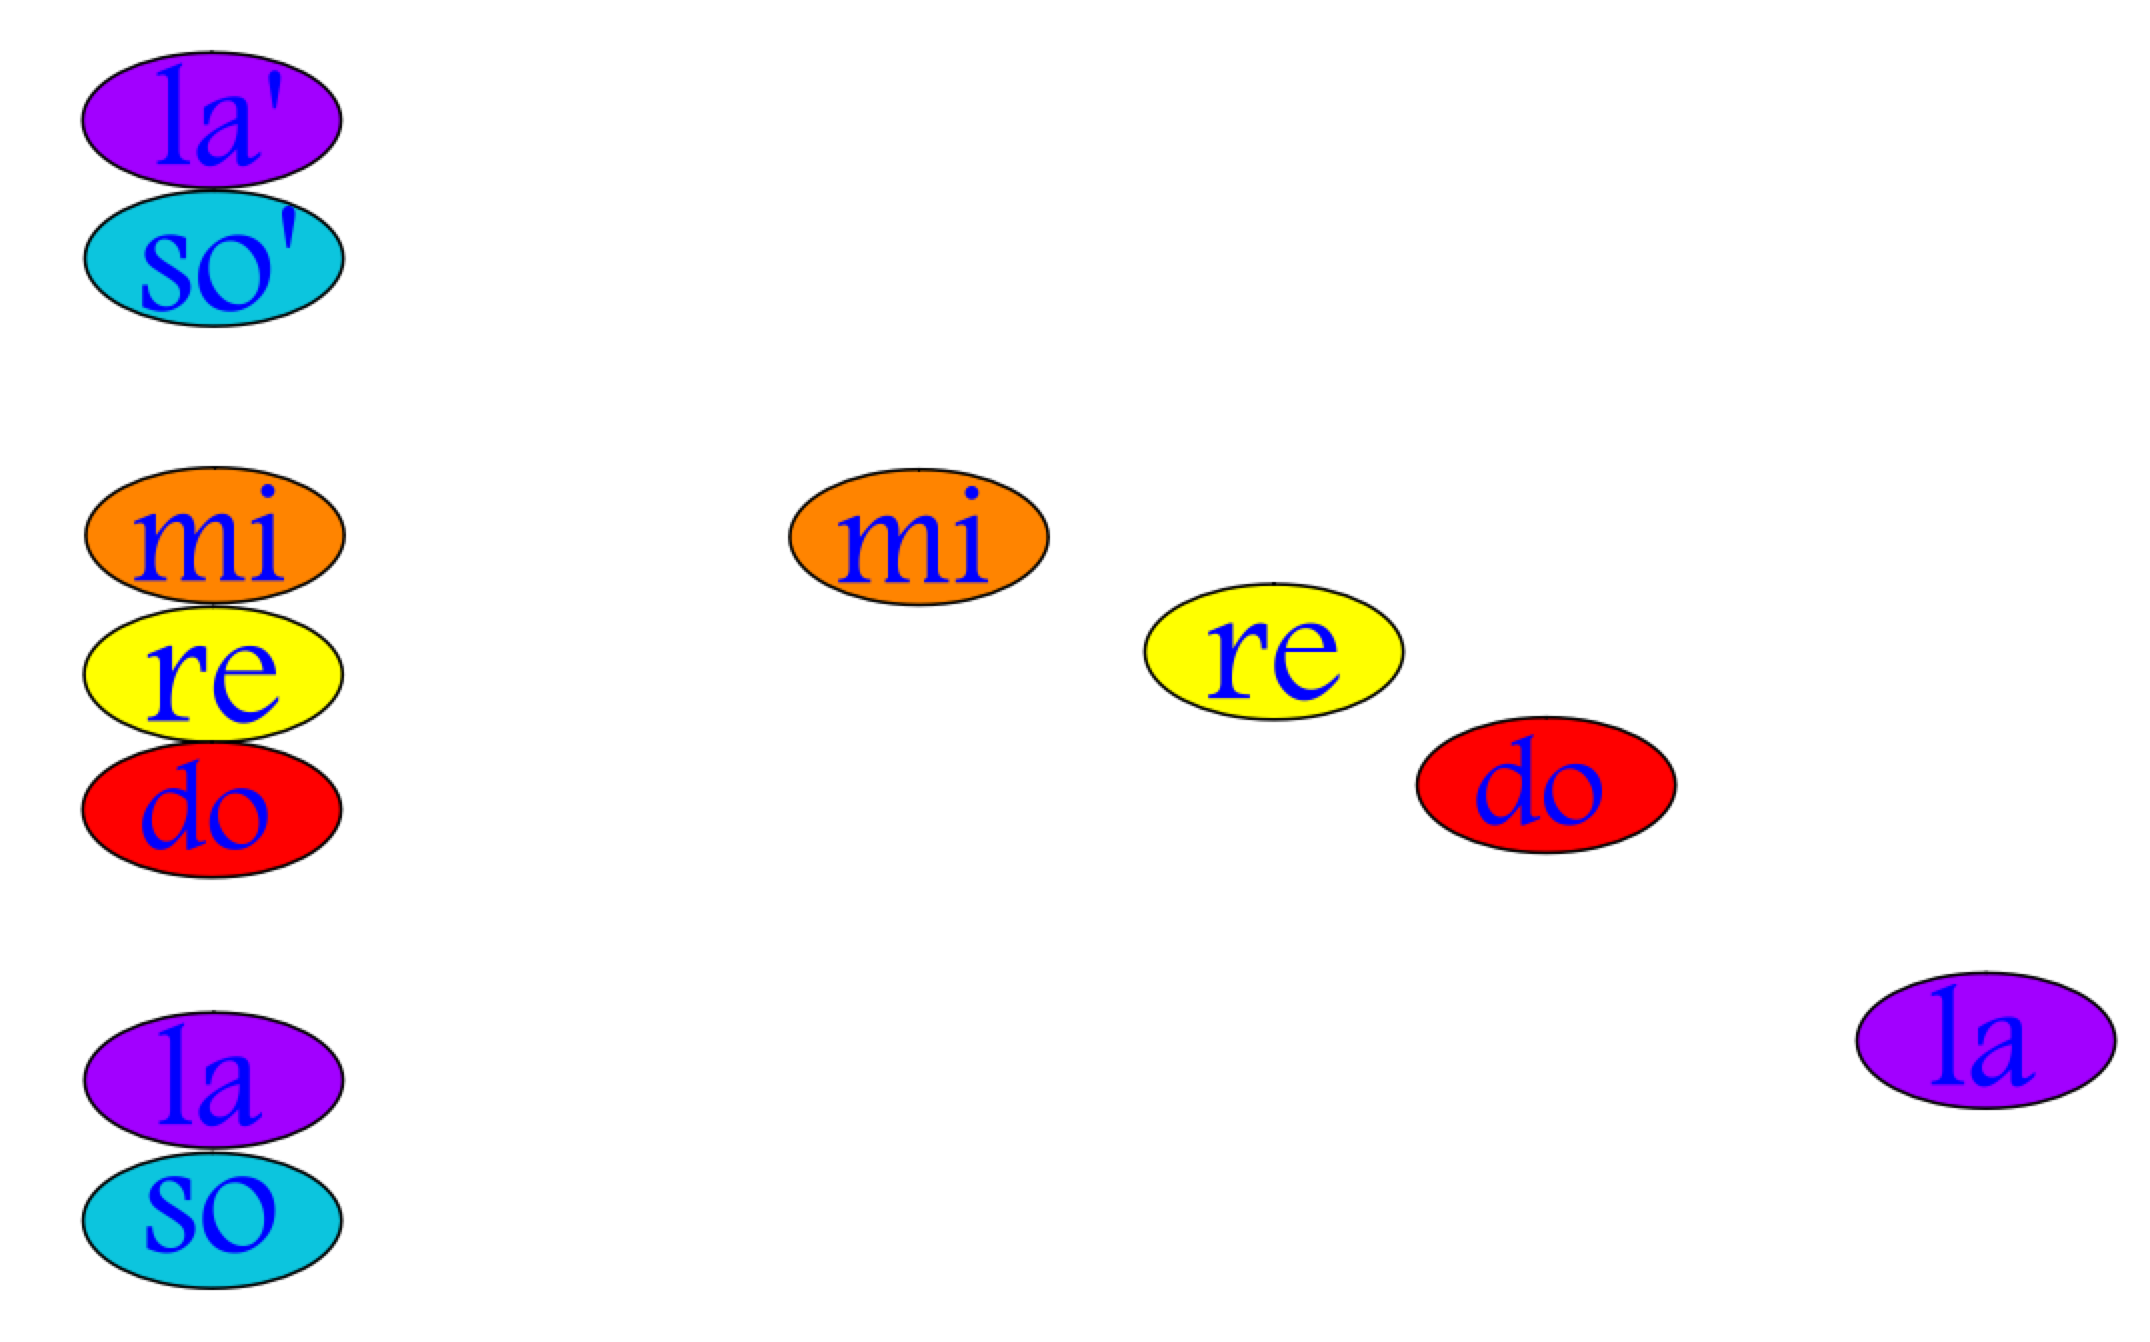
Connect both hands on the top of the head for mi, shoulders for re, both hands at the belly button for do and both hands on the tops of the thighs for la,. You might also choose to go right to note names at this point as well.
Next transfer this to the pitch stack visually and have students read if from there; first the students will be echoing the teacher as they point, and then reading and pointing on their own in the context of the song.
Then, add the challenge of the melodic contour, ask students to point in the air at each pitch with alternating hands as they read and sing the syllables.
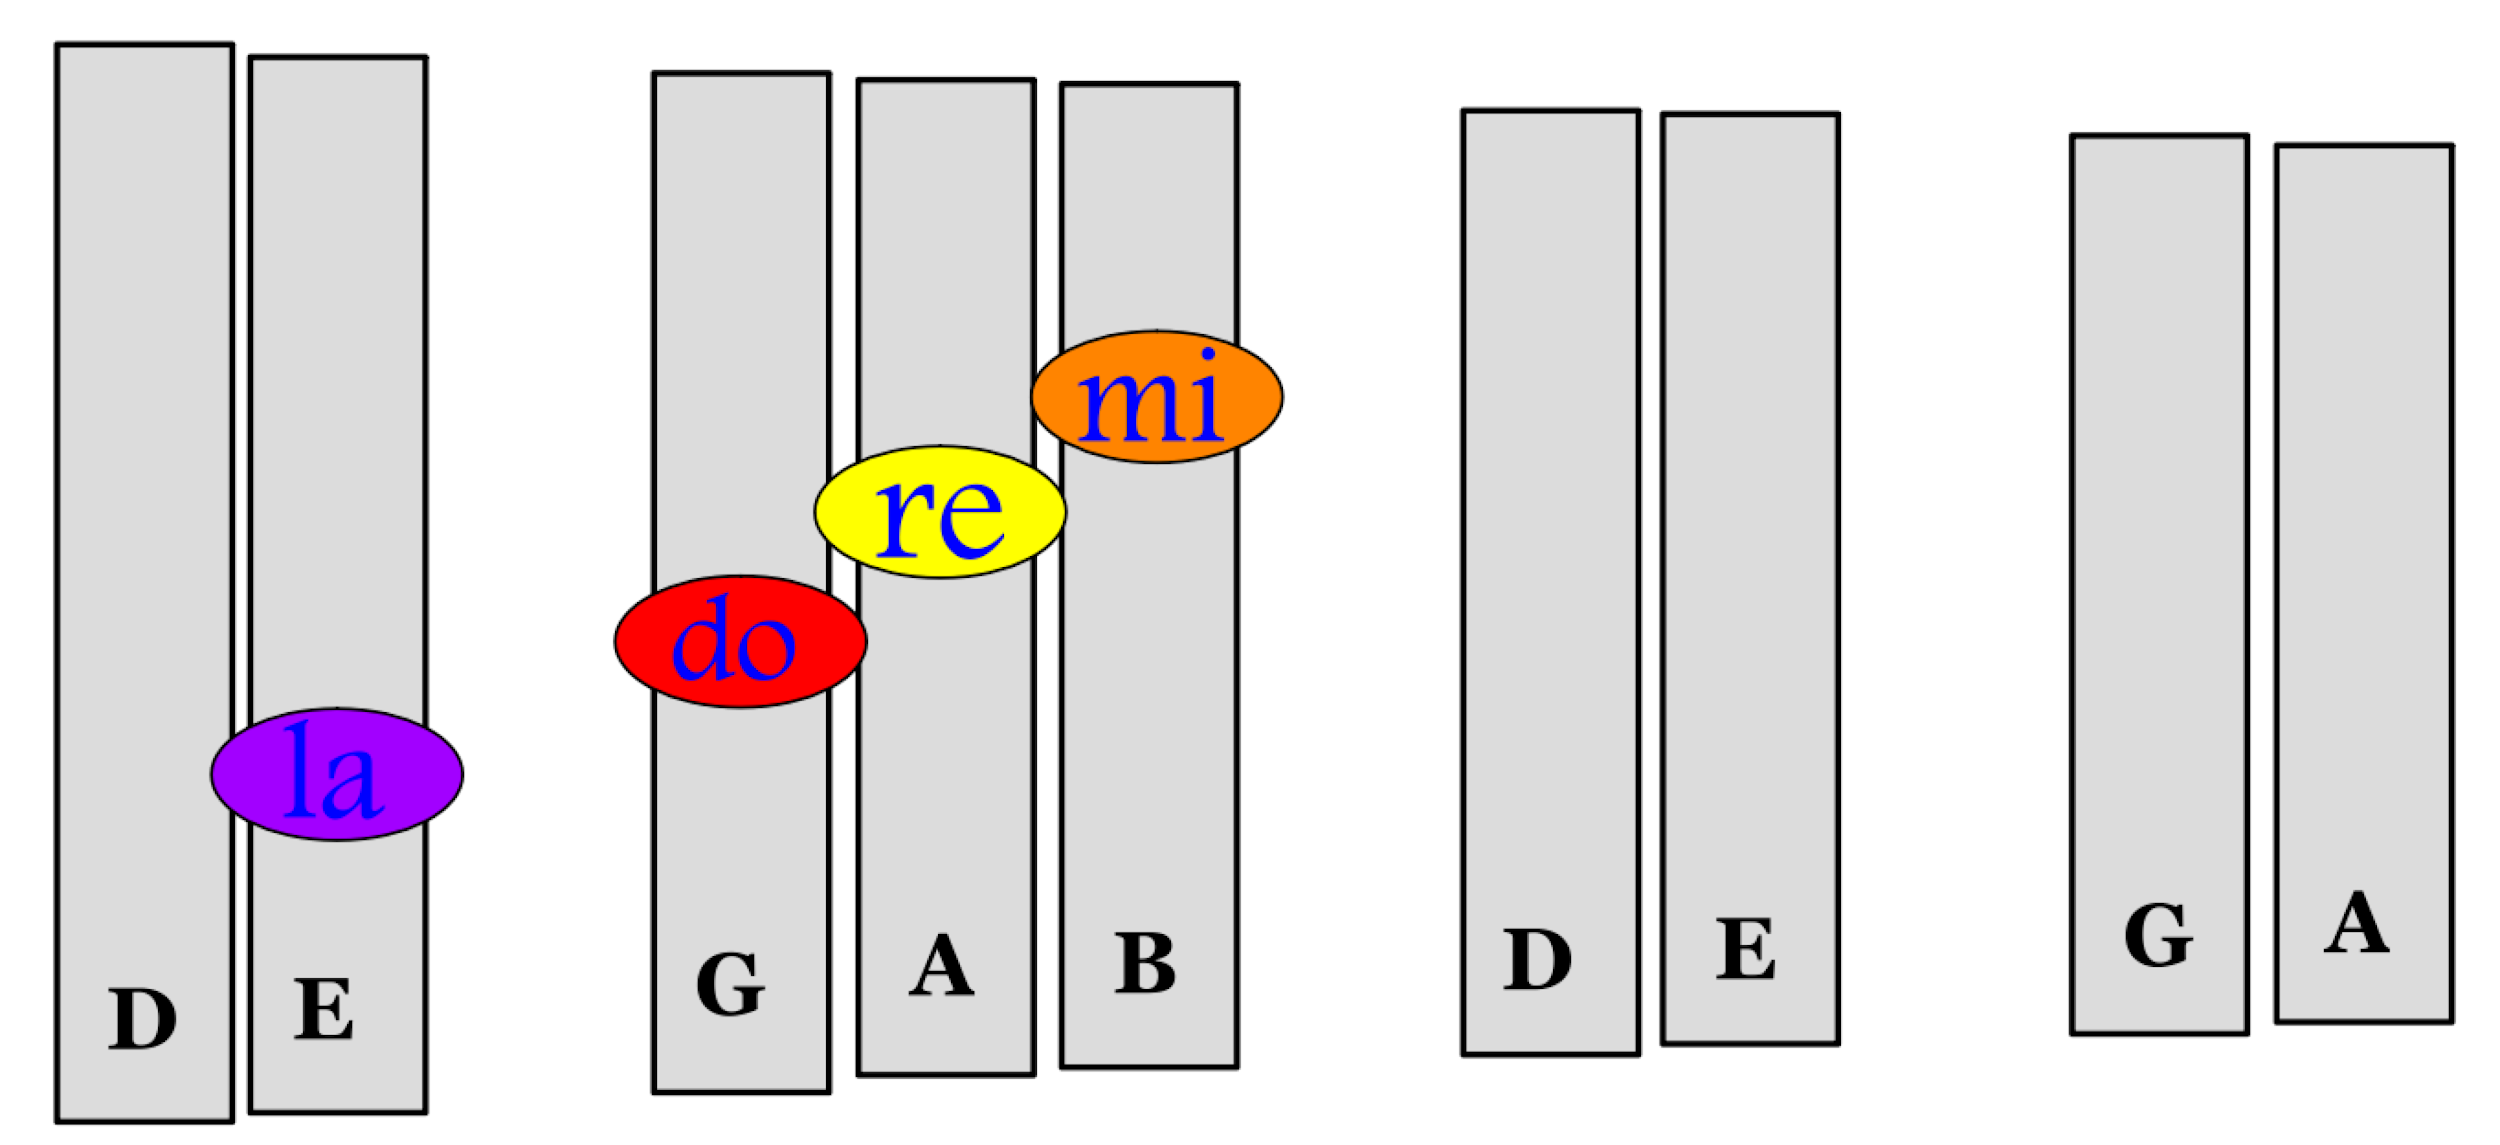
Next, transferring this visually onto an image of an instrument will help students successfully transition to playing the melody on actual instruments.
Give students “Fake Mallets.” Pretend to throw a huge handful of mallets out over the class and have them “catch some fake mallets.” Then the teacher with actual mallets should play and sing the melody syllables on the projected (or even a chalkboard or marker board image) of this visual above. Have the students echo this pattern and play in the air with their “fake mallets.”
The next step is a student favorite, “The opposite game.” The teacher sings and plays the syllables, and the students have to sing back the letter “note name” that corresponds to that syllable. In this case, the teacher sings and plays, “mi, re, do, la,” and then the students sing and play back “B, A, G, E.” Next show the students the actually notation. Ask them to play the opposite game with the notation first with the syllables written for them.
And then read the note names without the syllables written.
When this is something students do with ease, they are ready to increase their challenge level to playing instruments!
Level 2
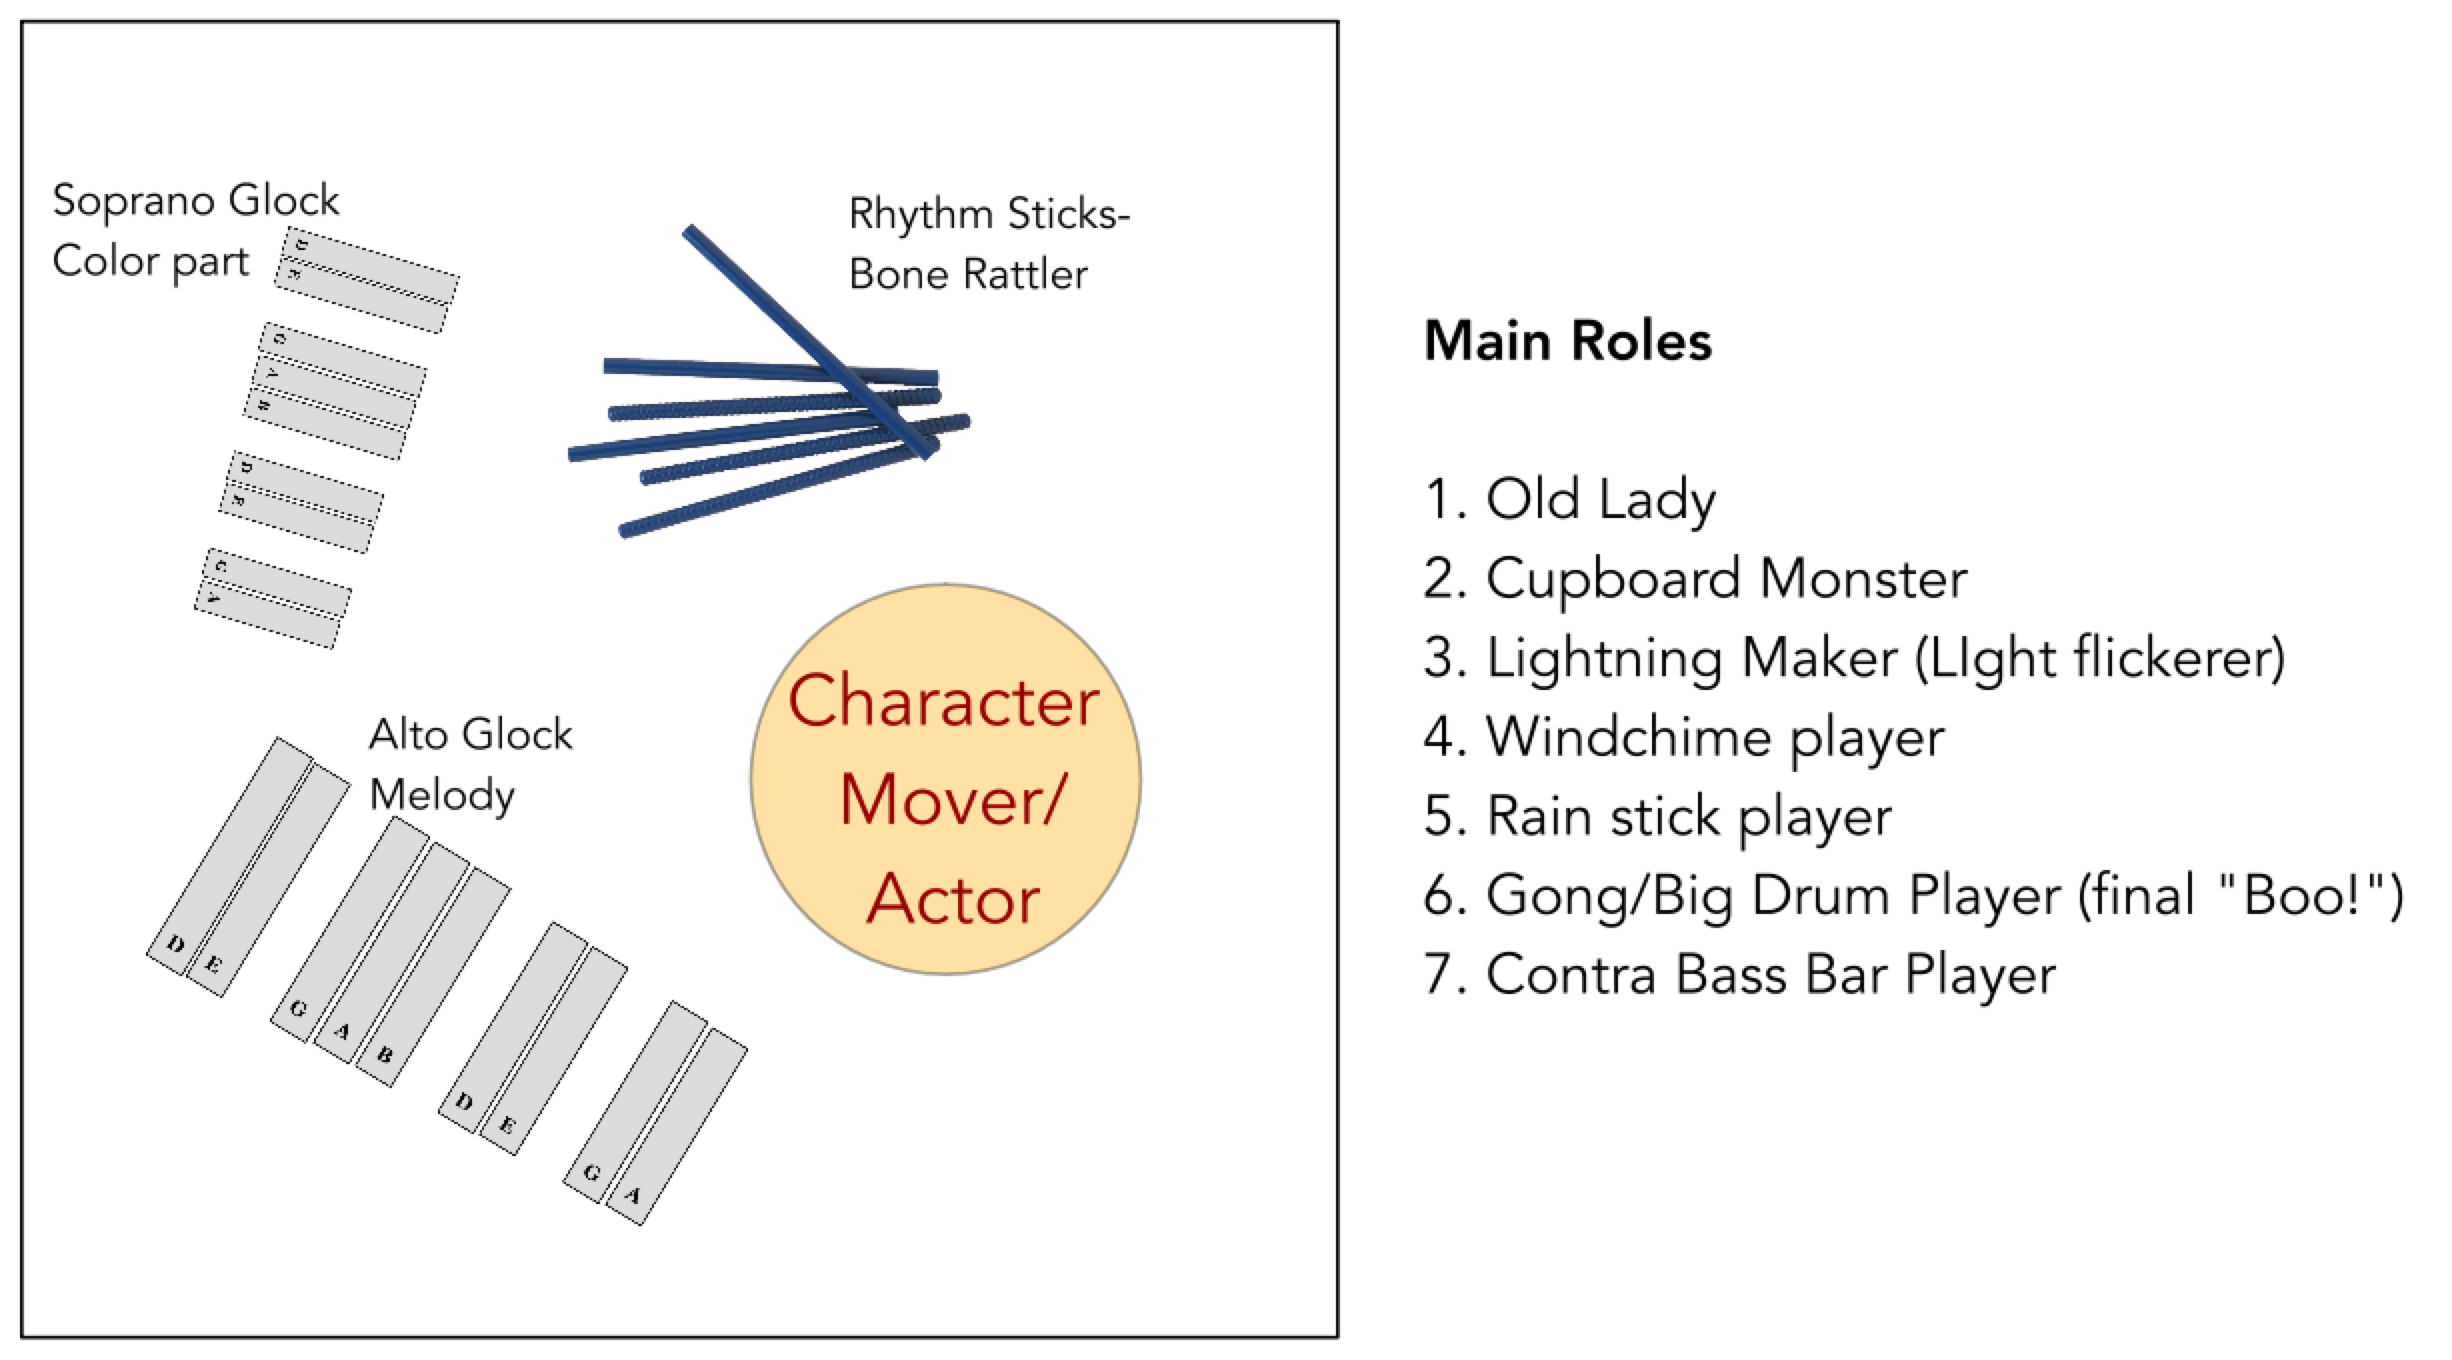
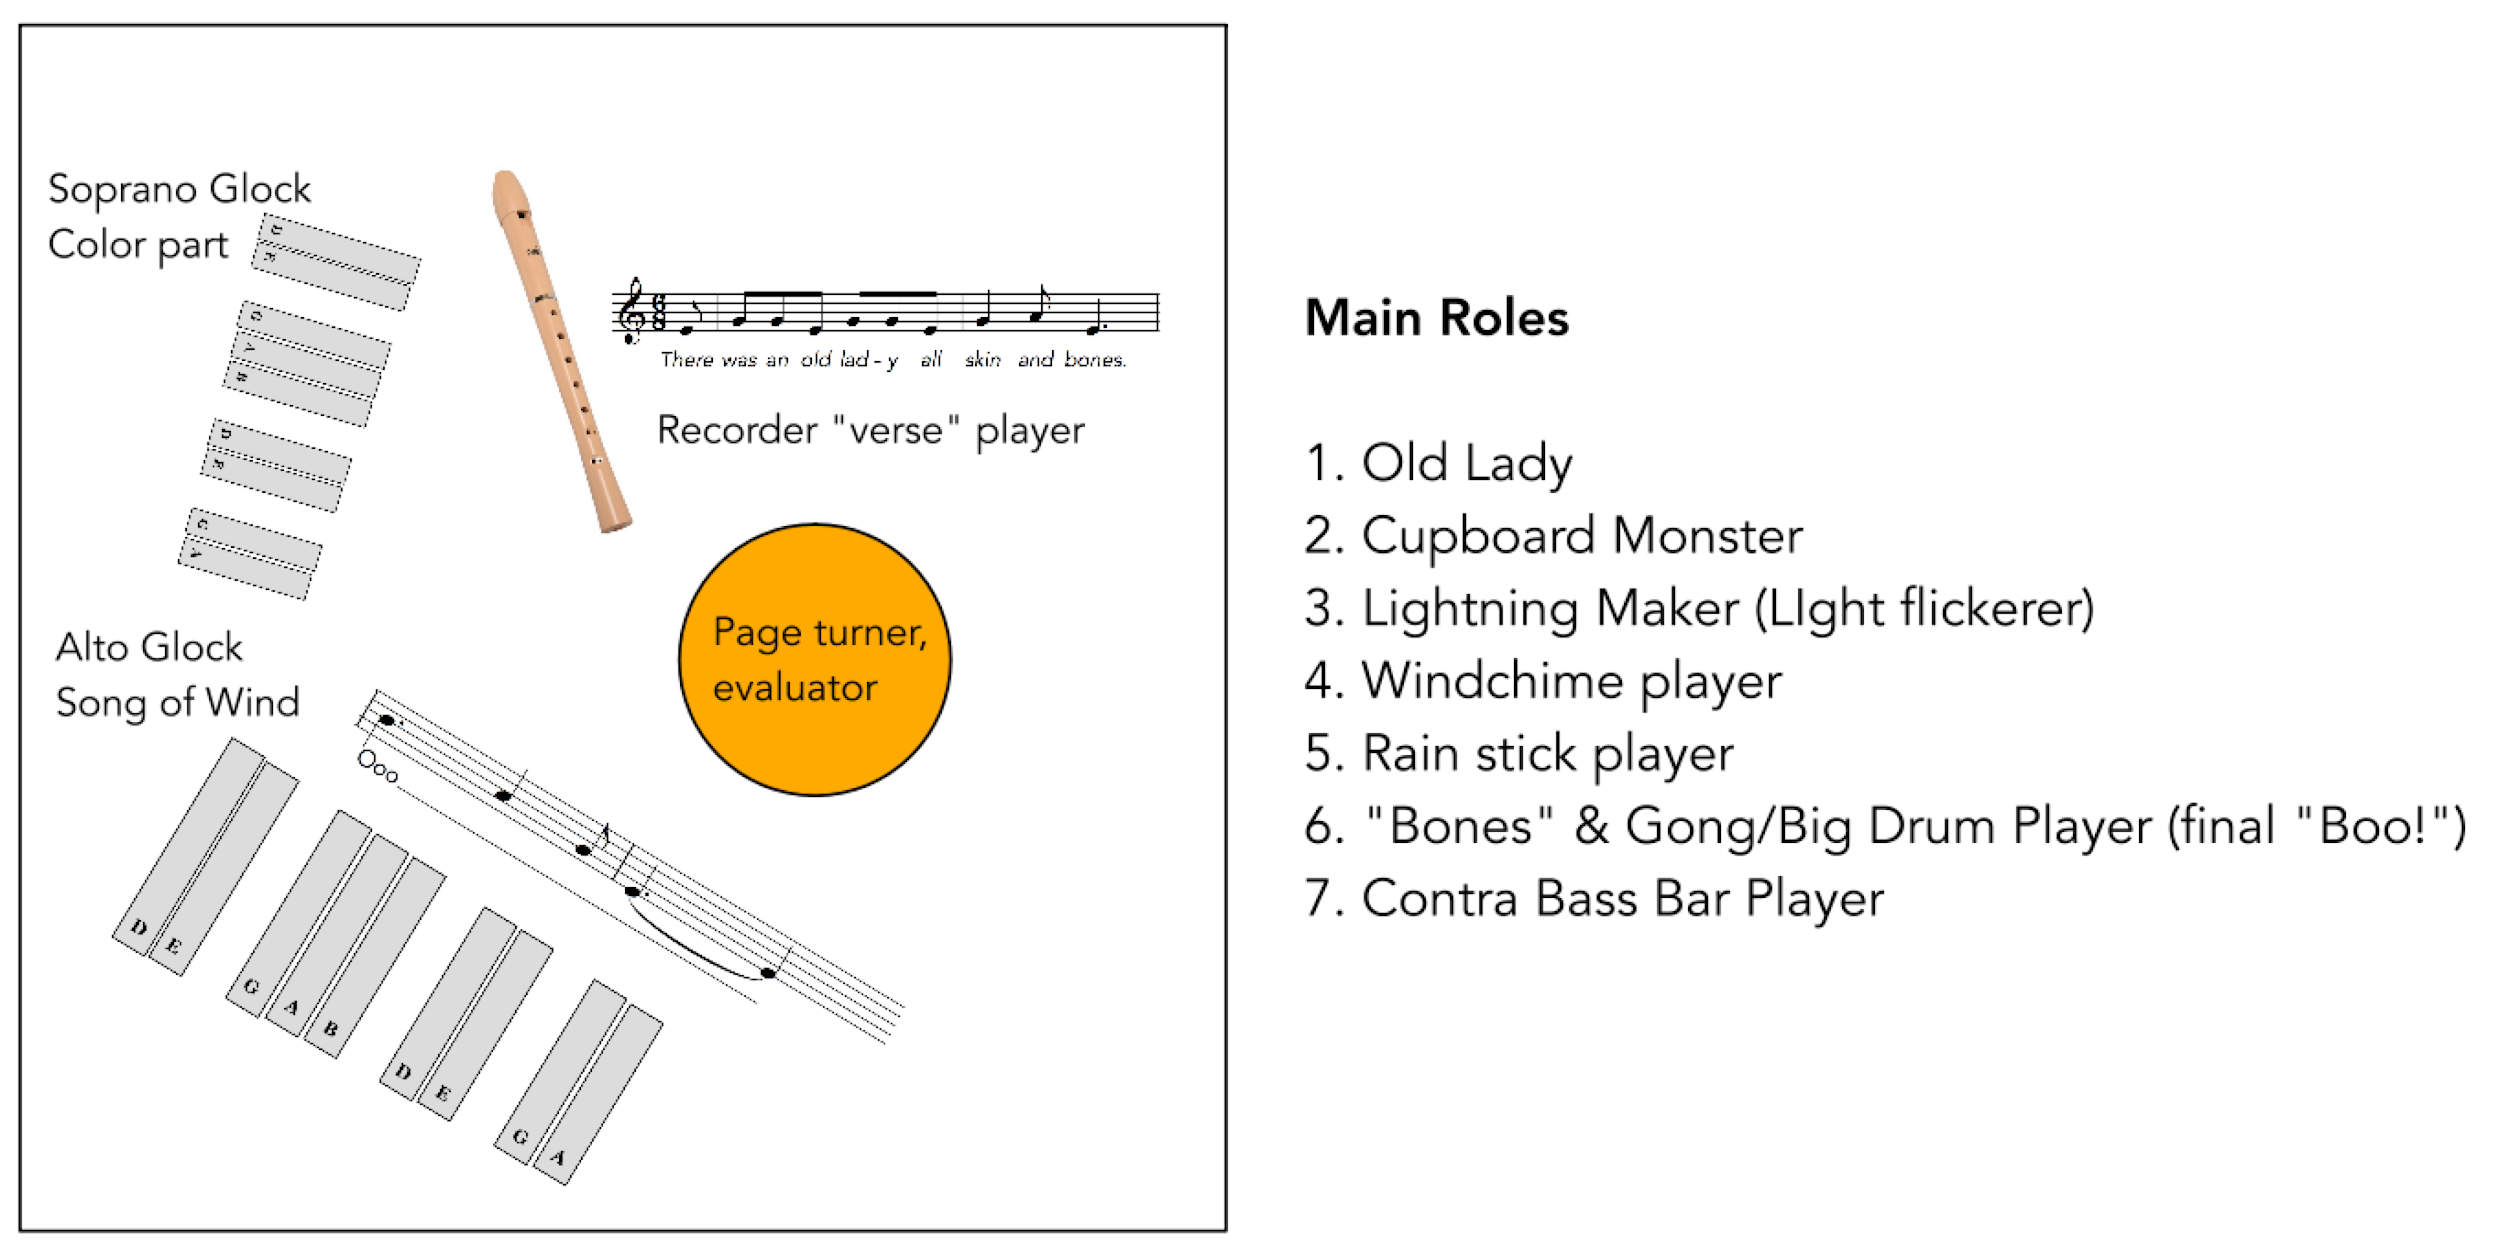
This melody sounds fantastic when played on alto glockenspiels and the color part at the end of the melody is played on a soprano glockenspiels. In a space in the room, consider setting up the glockenspiel area. Soprano metallophones will also work as they play in the same range as the alto glockenspiel. Consider this: to keep the sound from being too overwhelmed by the metallophones, have students playing those instruments use “stick ends” of mallets.” This will give you more instruments for playing without the reverberating blast of metallic sound. Students, when allowed to explore this option, usually prefer it more for its mysterious sound. Use the alto glocks and soprano metallophones for the “Song of the Wind,” melody, and the soprano glockenspiels for the color part at the end of the phrase— “play with the breath.” Add all of the singing of the song story, the instruments and actor roles back into the game from above. Switch roles with the same “eyes closed” approach as in earlier grades and the game becomes enriched musically and more vibrant in the sound landscape it now creates.
Level 3
Create groups of four students. Each person in this group will have one of these roles, 1. Melody player for “Song of the Wind” on the alto glock, 2. Color part player on a soprano glock, 3. Bone rattler (use few rhythm sticks in copier paper box lid) 4. Graveyard movement character (trees, black cats, mouse, owl, etc.). As the games are played this small group will rotate through each station several times, and the main characters of the game will still be chosen by “closed eyes, not talking” role switching. To help make this clear here is a visual of what is going on in the room.
5th Grade
Level I
We begin in fifth grade with the same approach as was taken in 4th grade. We will be transferring the “Song of the Wind” one more time from barred instruments to soprano recorders. The approach is very similar, but this time we can begin with the notation as it was something very familiar to them by the end of their 4th grade experiences. If this is not the case, you’d have to circle back and bring them up to speed with the body scale, pitch stack syllable → note name transfer that is outlined above.
Have the students echo sing this pattern while they are reading it.
Next ask them to play the opposite game, teacher sings the syllables and students sing the note names. If this is weak, circle back and sing the note names for them and have them echo.
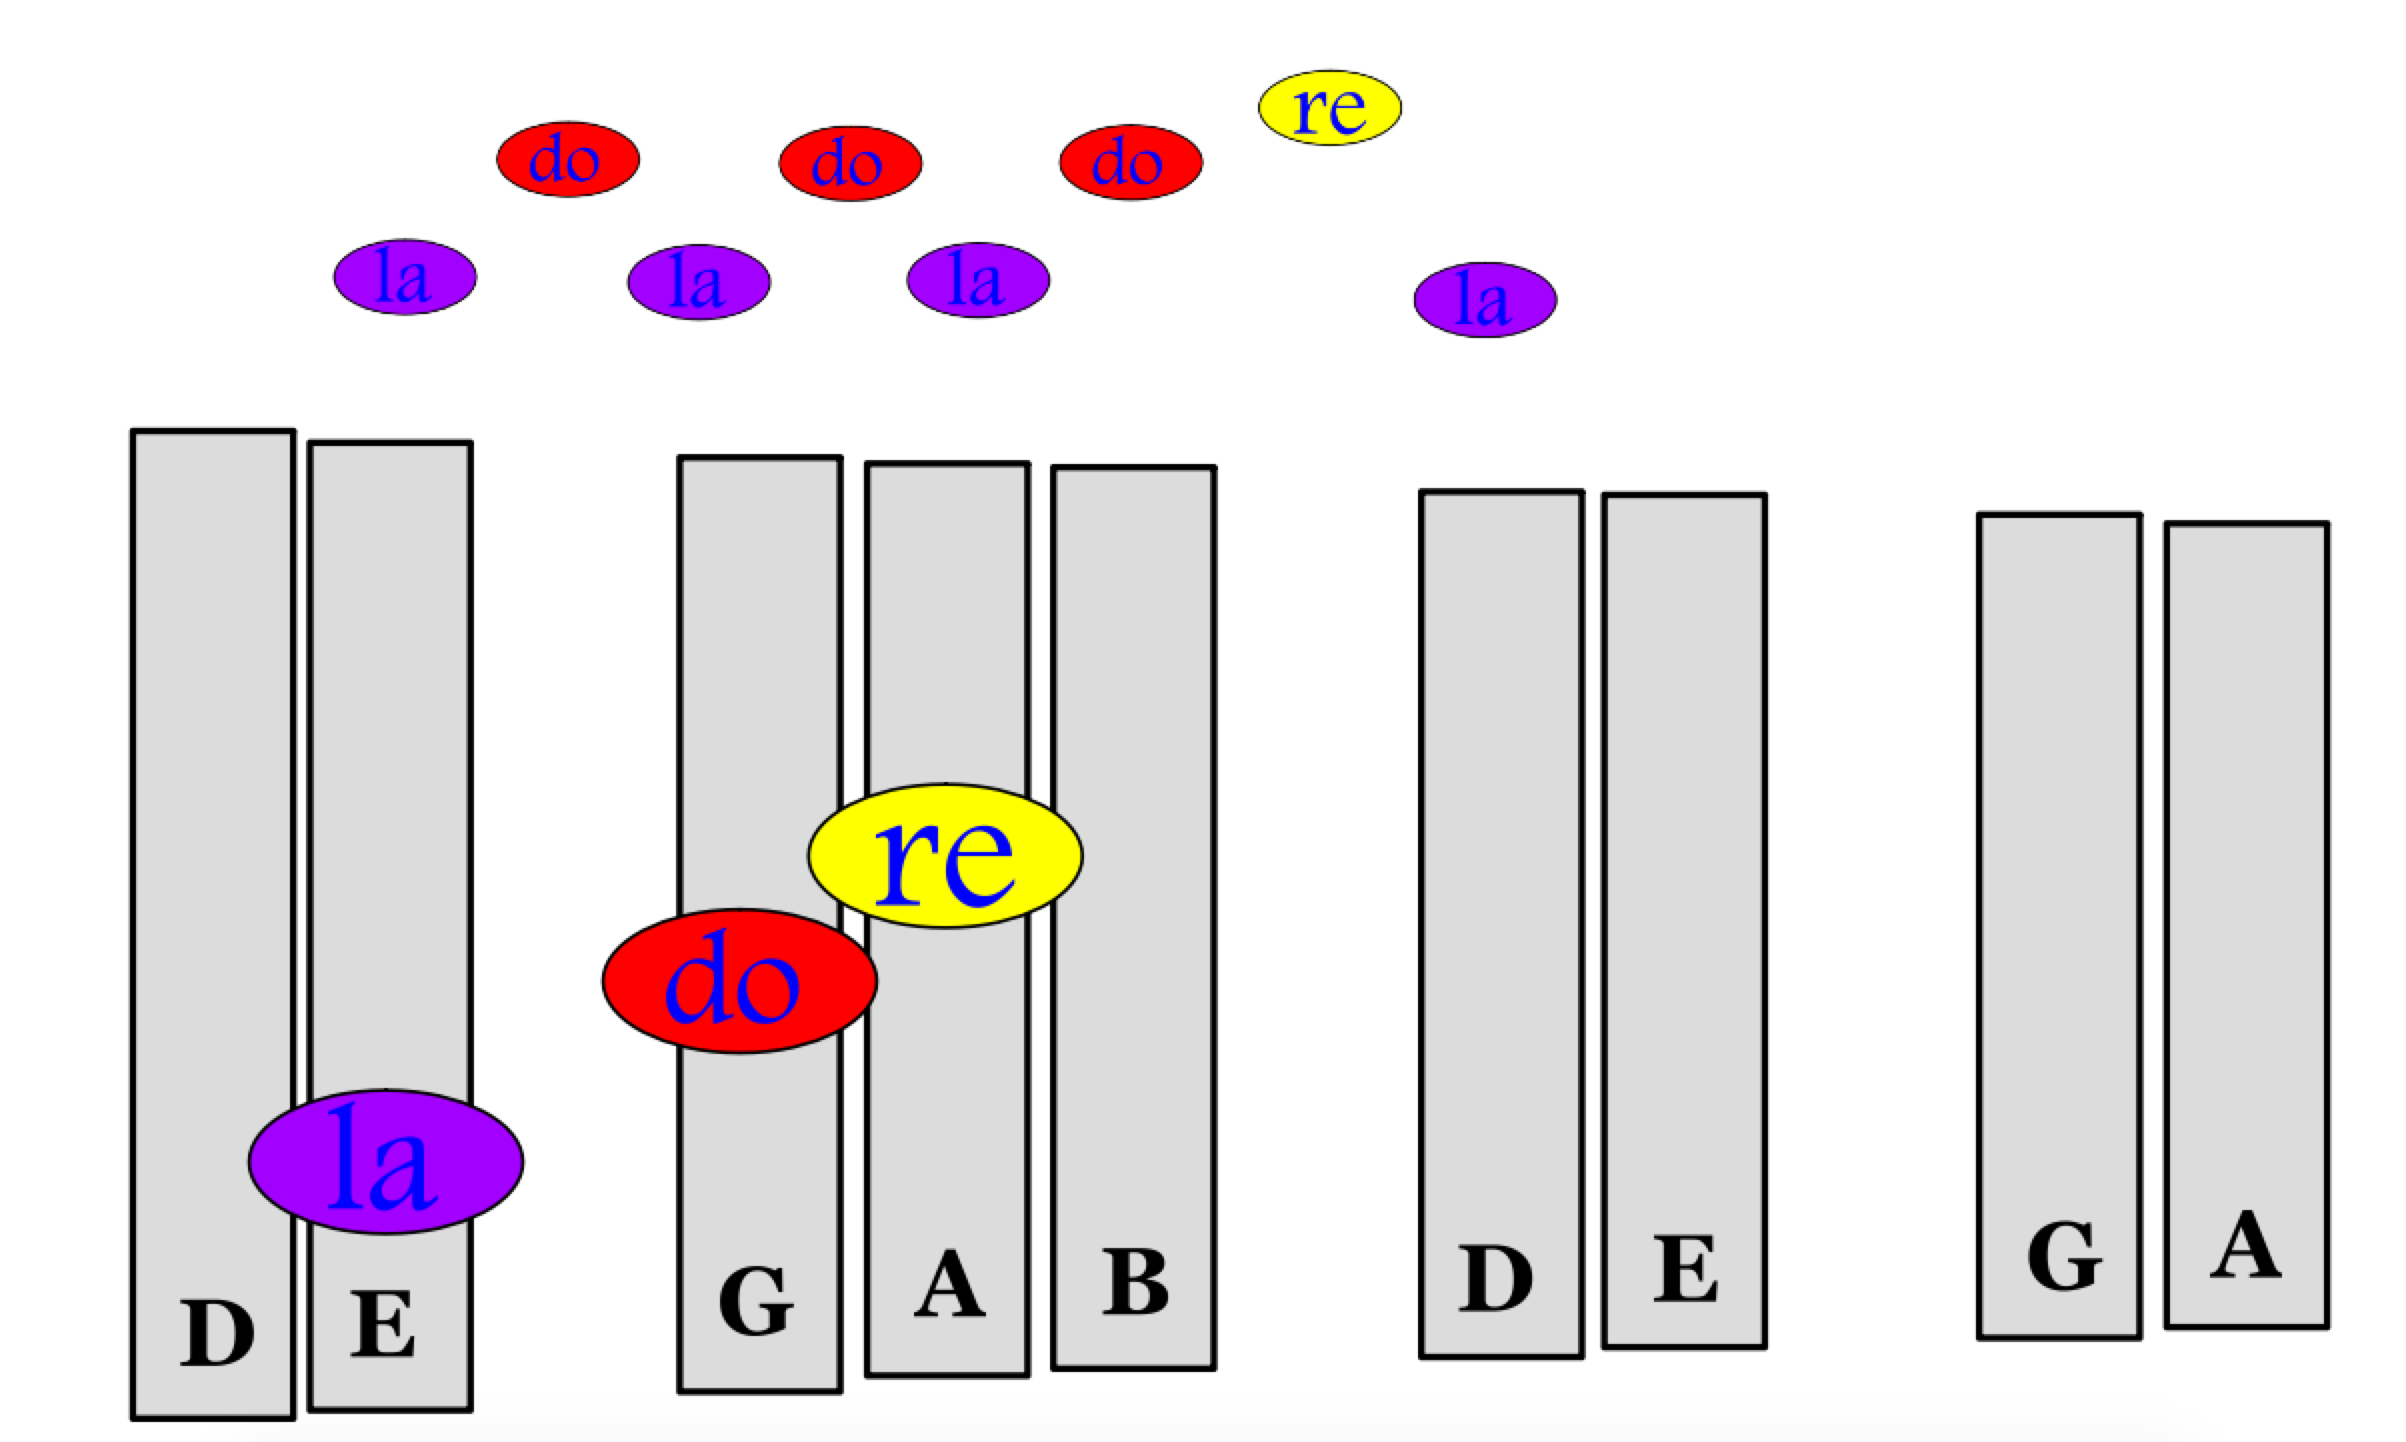
Next, assuming there is some basic facility with recorder playing at this point, ask the students to play the rhythm of this melody all on a “B.” Teacher plays, students echo. Do this again for A, G and E.
Next, the teacher plays the whole pattern and students echo. Often students will hear the “Hot Cross Buns” pattern in there. Many times they have ended up singing, “Hot Cross Buns, BURNED!” This is pretty easy to hear as the low la, gives it a minor tonal center. At any rate, when the students can play this, Add this element into the game. Since it is important that all the students have a lot of practice playing this pattern smoothly, this is the only special thing happening and the recorder players are all spread out around the room and the only time they aren’t playing this pattern is when they are in a special character role. They sing the words of the story and play the “song of the wind” melody on recorders. This really reinforces slow, easy breath for the recorder, and gives a lot of technique practice.
Level 2
Bringing the challenge level up, we ask the students to learn to play the melody on the recorder for the whole song. This is overwhelming if they are asked to “read the music” like they would have to were they in a band. Here we make it very simple. Since they know the “Song of the Wind” pattern so well, it is memorized. Now we simply ask them to sort out the notes for one phrase at a time in which the melody contour stays the same, but the rhythm changes. First we learn the melody contour.
Once students can apply this to their body scale in echo format, they can play the opposite game.
Once they can play the opposite game with barred instruments, they can play the same game with notation.
Finally, once they can play the opposite game, (sing the note names after the teacher sings the syllables) they can read the notation without any help.
Next transfer this to the recorder, the teacher can play it first and the students can echo it. (This will help the auditory learners in your classes who will want to hear it and then recreate the sound themselves which will then map the visual learning in their brain for them at the end of the process.)
Next, the students can work out how to play the rhythm of each phrase based on the text and the actual notation.
*Pit Fall Alert!* This next one is tricky! The students have promise to NEVER blow into their recorder on the “Boo!” or else your ears will never forgive you. Everyone must swear a solemn vow to remove their recorders and point to the “Cupboard Monster” area when they appear. If anyone plays the shrieking horrible sound that you can imagine will ensue, the consequence must be swift, severe and unwavering– most importantly it must be discussed ahead of time. No warnings are given!! This can result in irreparable hearing damage! If this occurs, a missed recess to read about how hearing damage works could be a consequence, or being banned from ever playing the game again, or something equally robust.
Here is a link to a printable 8.5 x 14” melody cards for these patterns. Using these cards, have students work in pairs, one partner will play the pattern, and the second will evaluate their playing and change the cards for each phrase (they are numbered, so the students will be able to keep them in order easily). Switch.
Level 3
Create groups of 4 for playing the song. Rotate through several times!
6th Grade
Level 1
In sixth grade, students are happy to take over a bit of the control of the process for this game. The love it and know it deeply. In Level 1, they are challenged to improvise new melodic and rhythmic patterns that will fit with the mood of the game, and the arrangements we’ve been using in the past. It is a higher level challenge to create words that fit with their creations, but many rise to meet it.
Level 2
Students share their ideas with one another in small groups. The challenge set out for them is to play the main melody on recorder for one verse and response while playing the new patterns concurrently. Share these ideas with the group, the teacher collects them and writes them into notation for the students, and then in a subsequent class, tries to incorporate a few of these ideas into a new arrangement that belongs heavily to the students.
Level 3
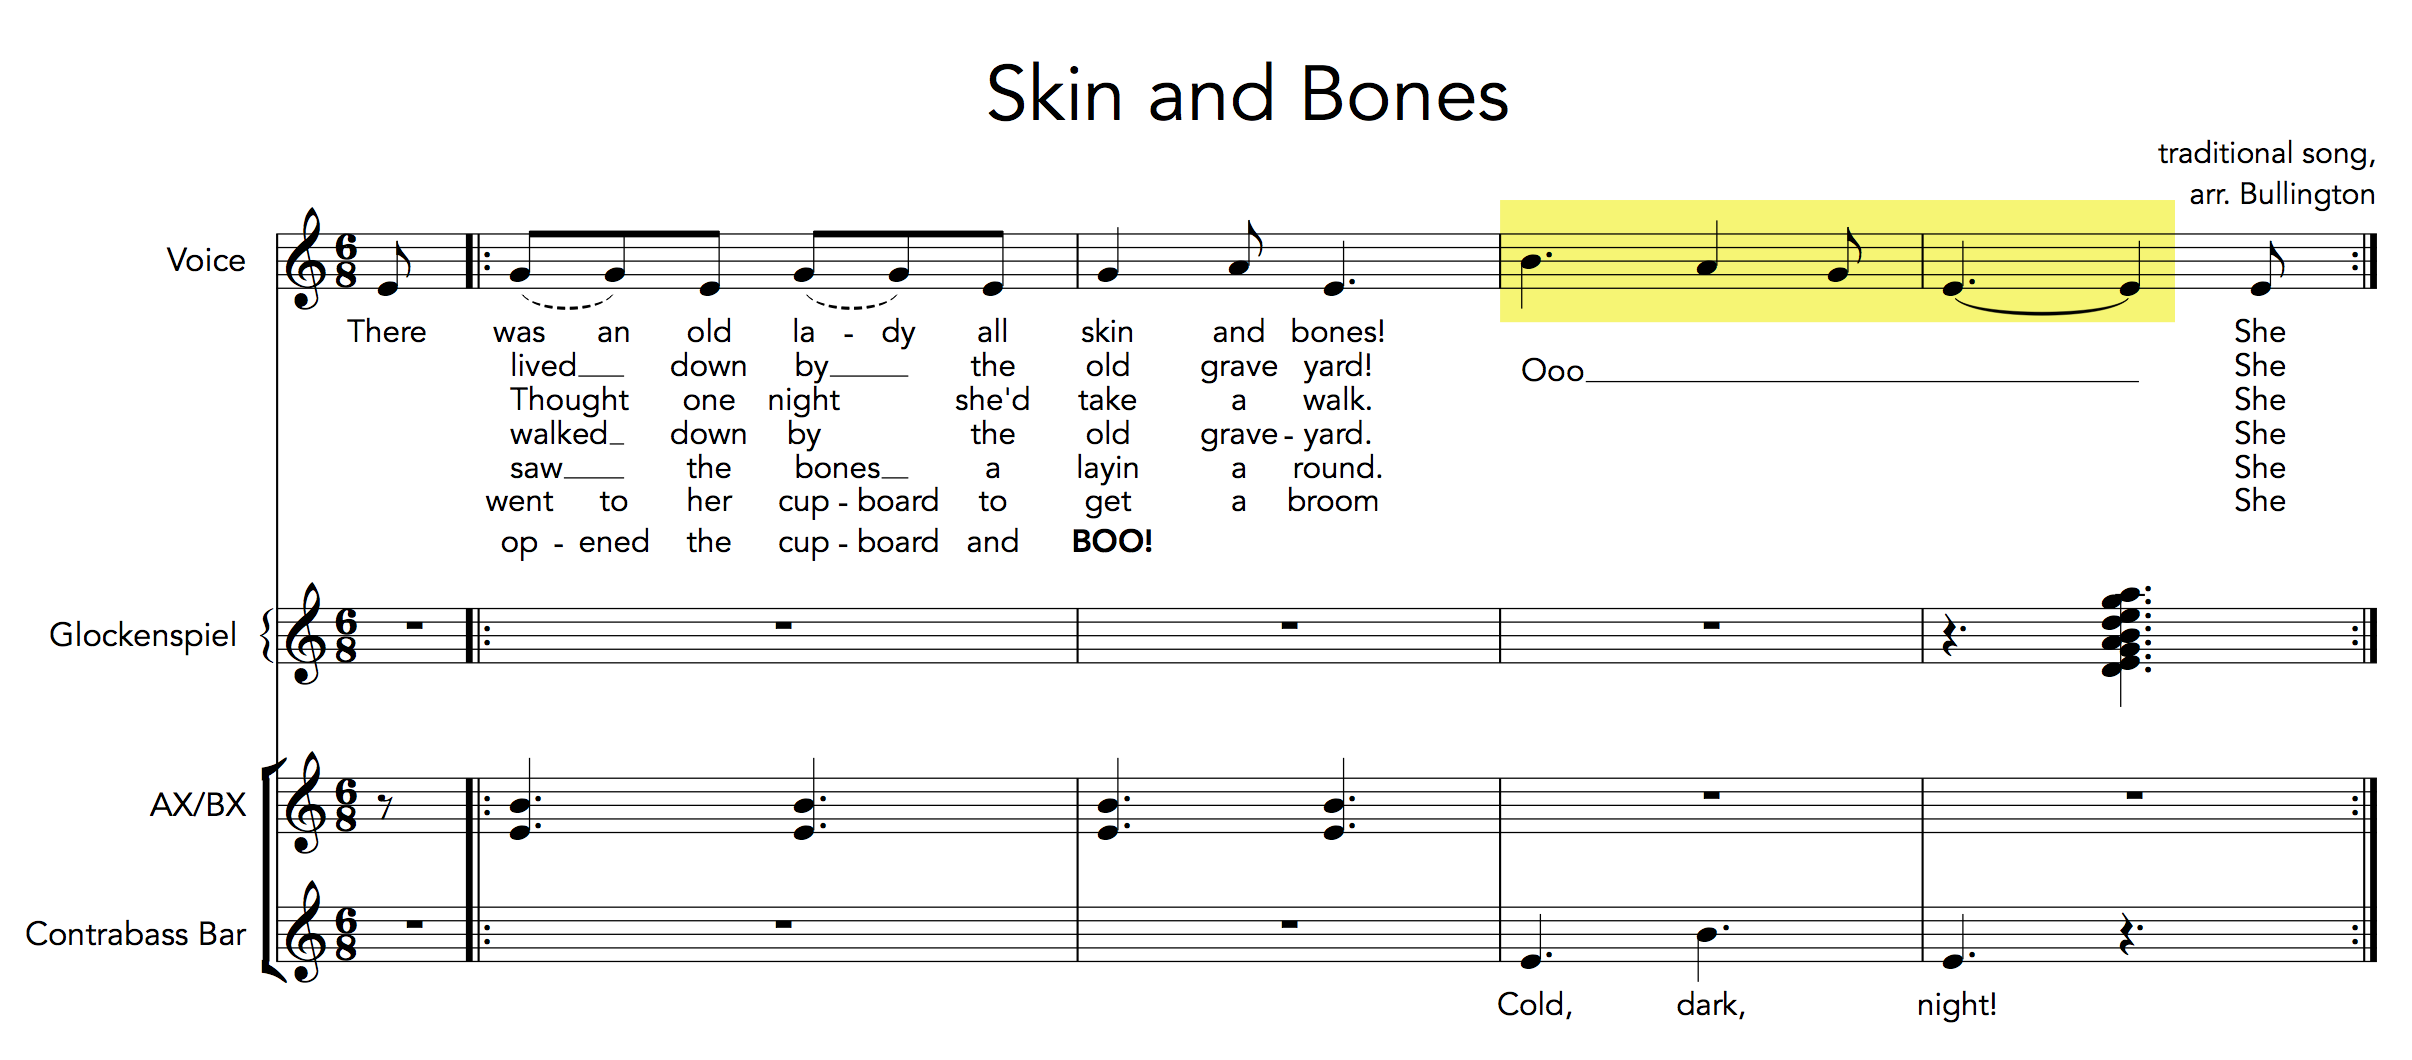
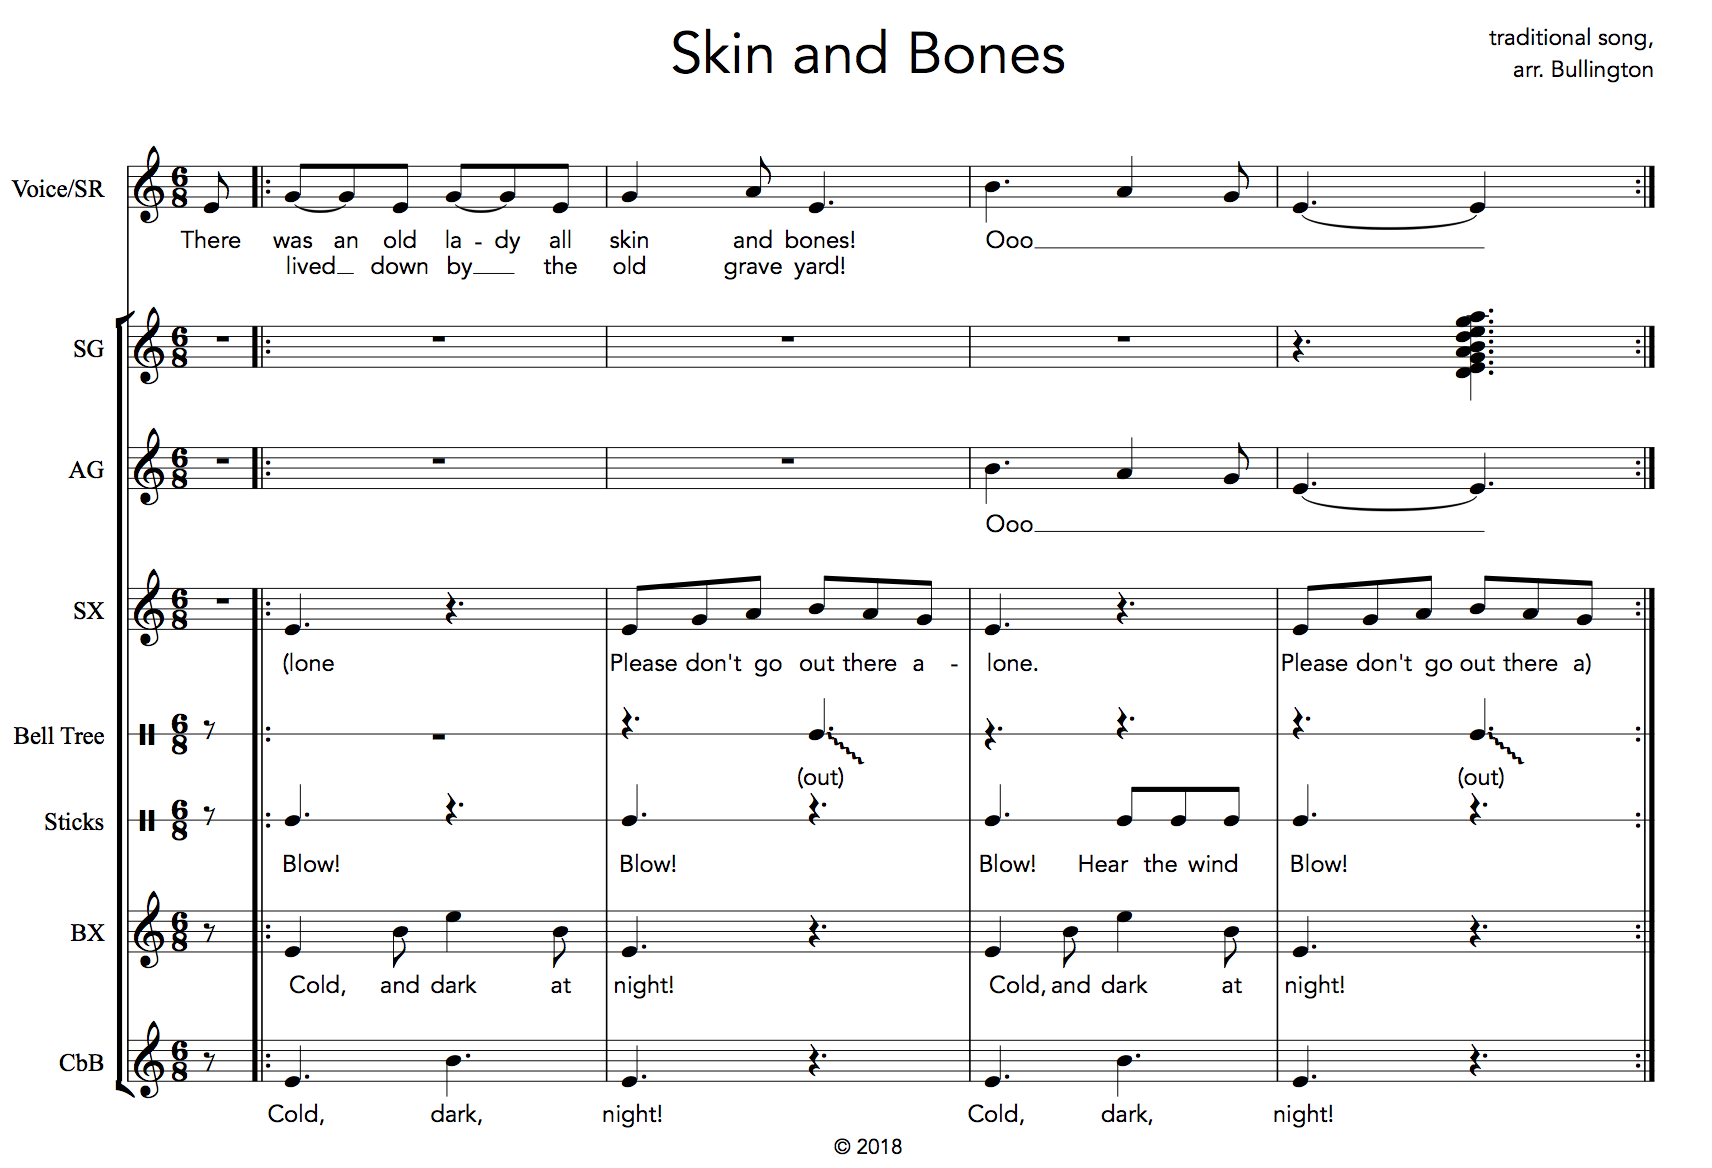
Here is an example of a score that was created by some 6th graders that uses familiar ideas from their past experiences with some elaboration on their part. One challenge that was set out for them was to make a bordun on a bass xylophone. Another was to create a flowing part on a soprano xylophone. Another group’s challenge was to create something more interesting with sticks and movement that makes the “Tree” part more fun and exciting.
This is an example of student ideas being shared within a community of learners and then the teacher taking their ideas and crafting them into something that is aesthetically pleasing for everyone to play and enjoy as a group.
The facilitation of six years of learning with one particular folk song in a skill spiral will provide amazing results year after year when your students are invested and excited to revisit the activity in the way they thrill to spend time with a friend they only see once a year!
Good luck to you as you explore the wonderful autumn music repertoire and hopefully this gem will find its way somewhere into your students’ lives. We’d love to hear your thoughts about this lesson spiral! Please share your ideas and plans with our readers.
For expanded ideas on “Skin and Bones” plus other inclusive lesson ideas for fall, check out our webinar Autumnal Illuminations!
Originally published on Teaching With Orff October 18, 2018
See all posts by Drue Bullington
6 Comments
Leave a Comment
Sign up for latest Orff Tips, Lesson Plans and Advocacy Tools
Empower your students to create their own music in this free 3-day challenge with Roger Sams. (Lessons delivered via email)

Learn about the legendary factory that started it all and why so many teachers like you love our instruments.








Nicely done Drue! I’ve been on pins and needles waiting for Part 2! You didn’t disappoint. Thank you for sharing this beautiful spiral lesson! And 6th grade level brought in a nice creating opportunity!
Fabulously done!!!
Thank you, Drue. You taught me this song in Orff 1. I had gotten tired of it, but now have so many ideas to add new life to this student favorite.
This is really a great lesson and I have been using it the past two years with great success. Recently, I was looking for a way to add improvisation and found that once the students can play the song of the wind, (4th grade in Drue’s plan), they are ready to improvise using those same 4 pitches. I squeezed in a level in 4th and 5th grade where we use the idea of Call and Response to allow an opportunity for students to improvise during the call (the lyrics) and their classmates still play the response (“song of the wind”). Students can improvise on barred instruments or recorder depending on your students.
This is a great addition, Erik! I also explored with having students improvise on barred instruments using tremelo as a transition between players. Using a limited tone-set, say, E G A B, I asked the students to improvise in an unmetered fashion and when they were feeling “finished” to play a tremelo on any of these notes that they chose. Their partner then begins their improvisation by joining the tremelo and when the original partner releases the tremelo, the new player and begin theirs. It is an activity that lives outside of the game and is a beautiful “next step.” Thank you for the reminder about how important improvisation is for the students, our goals should always be striving toward inspiring student creativity!
Thanks for these wonderful ideas! I just started teaching this last year to my 1st and 2nd graders. This year, those kids are “all in” for this song the moment they hear me sing the first line! Looking forward to making this a nice seasonal song with new ideas added each year.